Wednesday, October 19, 2016

Birthday Cards Galore!

Wow!  It's been a long time since I've written on this blog.  I've been busy with work (lots of changes, added responsibility, etc), two girls now in highschool, organizing the Burnaby New Westminster Ringette IceBreaker tournament and trying to find time to make some cards and to eventually get back into scrapbooking.

My youngest is playing on the LMRL AA Developmental team with some awesome coaches.  The Head Coach had a great idea, that they girls would celebrate each others' birthdays, and that each player had to write something positive that they admired/liked about the other player.  Fantastic idea - but that means loads more work for "mommy" as Ori is too busy with her schoolwork, and her practices/games.

So here are 4 cards that I have made below for the little miss to give away tonight:

Card 1:


For this card, I stamped Stamping Bella Uptown Girl Isabelle loves Ice Cream, using the Memento Black Tuxedo ink.  I then colored her in using copic markers.

I wanted the background to be soft, so I used chalk and makeup sponges to carefully color in the background.

I then cut out the label from a sheet of pearlescent cardstock using one of the Spellbinders large labels. For the sentiment, I used Penny Black's Sweet Wishes collection and Versafine Deep Lagoon Ink.  When stamping on such a glossy surface, I made sure I left it overnight to dry so that the writing didn't smudge.
I wanted to add some sparkle to the dress, and to highlight the sentiment even more.  I carefully added the Studio G glitter glue over her dress, and outline the label.  It may look a bit clumpy when it is wet, but if you leave it to dry for a few hours, you get this beautiful glittery image.


Card 2:


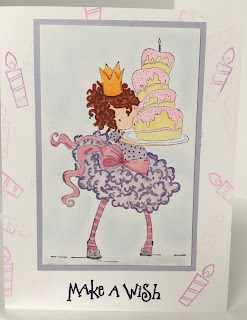
For card #2, I used another Stamping Bella Stamp - Tiny Townie Bree loves Buttercream.  Same as before, I colored her with Copics and used chalk to color in the background.

I thought the card looked a bit plain, so I used three different shades of pink/lavender VersaColor ink, and stamped the background with a candle stamp from Penny Black's Sweet Wishes collection.  This is where the sentiment also came from, though I stamped it in VersaFine Imperial Purple, and outlined it with a glittery Sakura pen.

 
Once again, I wanted to highlight certain areas, so used glitter glue on her sash and crown.


Card 3:


This time I used a mermaid theme, using The Greeting Farm Mermaid Anya, and colored her with Copics.  She wouldn't be a true mermaid without jewels so I added craft pearls to her hair.

I then embossed the blue paper using the Crafter's Companion Scruffy Little Cat Bubbles embossing folder.  Using the same blue paper, I cut a circle using the Lifestyle Crafts Circle dies.

The lovely script stamp is from Penny Black's Sweet Wishes collection.

Once again, I used glitter glue to highlight the scaley suit of the mermaid, some of the bubbles and the sentiment circle.


Card 4:


This cutie is The Greeting Farm Birthday Anya 3 stamp.  I colored her with Copics, glittered her dress and hair bows.

I made a pop-out banner using the Mama Elephant Creative Cuts Bold Banner die.

For the two Greeting Farm cards, I (fussy) cut the images so that I could pop them out on the card which gives them a bit of dimension.


Enjoy!


Wednesday, February 25, 2015

Pinky Pink Challenge - TGF Farm Fresh Friday

I've been away for a bit but am back!  

Here is my creation for the Pinky Pink Farm Fresh Friday challenge over at The Greeting Farm blog.   I had so much fun with this as my youngest loves the colour pink. For her, there is no such thing as too much pink. With that in mind, I tried to use as much pink as possible!


I've used Sweet from the Sweet & Toxic stamp set from The Greeting Farm.  I've used Copic markers to colour her pink from head to toe. Found this very girly girl paper from Michael's. Added ribbon and bling. 


I wanted Sweet to be blingy without being too obvious so used two colours of  Stickles on her barrettes, hair bows, part of her skirt, the buttons her bodice and her sneakers.

Hope you enjoy!


Wednesday, August 27, 2014

Anything Goes Challenge - TGF Farm Fresh Friday

It was perfect timing that The Greeting Farm's Farm Fresh Friday Challenge was "Anything Goes".  I needed to make a Congratulations on Your New Home card for a dear friend who had recently purchased a home.  Since he has a little girl, I thought it was fitting to use Birthday Anya 3 (all little girls love cake don't they?).


I used K&Co pattern paper which was perfect for the card I wanted to make to show grass.  I took the The Greeting Farm fence die cut and make a white picket fence, with the house on top of the hill.  The house I made myself since I couldn't find anything house-like in my stash.

I coloured Birthday Anya 3 with Copic markers, and then trimmed her out using my X-acto knife.  Originally I was going to pop-dot her out, but decided against it as I'm sure my friend's daughter was will handling the card a lot, and wanted the card to be sturdier.

I have now given the card to my friend and his little girl just LOVED Anya and was so pleased that she was on the card ; )


Wednesday, August 13, 2014

The Greeting Farm - Farm Fresh Friday - Shaped Tag or Card Challenge

Here is my Shaped Tag Challenge from The Greeting Farm Blog.   This couldn't come at a better time since I thought I would make a tag for my niece's lunch kit since she will be starting a new school in the fall.

I've used one of The Greeting Farm's Magical Beans as she reminds me of my niece.  I've colored her with Copics.

I've used the Spellbinder Fleur de Lis Square Die to cut the tag twice onto two different types of cardstock.  I then cut a square out in the purple sheet and glued it on top of the patterned cardstock.

I then attached my Magical Bean cut-out, and added Prima Flowers. Since my niece loves bling, I've added Stickles to the flowers in her hair as well as on the Prima flowers.  I've also used a the Sakura pens to outlines the flowers on the patterned cardstock as it is glittery. 


Sure hope she likes it!

Wednesday, August 6, 2014

"Back to School" Challenge from the Greeting Farm Blog

Since I didn't make the deadline for the last Greeting Farm challenge (I read am instead of noon...sigh), I thought I would make another attempt.

This week's theme was "Back to School" so I thought I would make a good luck card for my daughter who will be starting high school in September.

 I used Cheeky Geeky as she reminds me a bit of my daughter with the glasses so I had to colour-dip her hair so that she looks just like her!  I took a Project Life journaling card and used a Stampin' Up notebook punch so it looks like this was taken out of a school notebook.  I edged it so it would stand out, and stamped Good Luck with Technique Tuesday letters.


As you can see here, I cut out Cheeky Geeky with scissors and an X-acto knife, and then used pop-dots to give her a 3-D look.

I can't wait to give this to her on the first day of school!

Thursday, July 31, 2014

"Christmas in July" Challenge from The Greeting Farm Blog

I've always considered myself more of a scrapbooker and only made cards when the occasion warranted it.  However, the thought of making layouts seems very daunting when you've been away from it all for a while.

Then a friend started me on making cards as a way to ease myself back into crafting.  A couple of months ago, my friend introduced me to The Greeting Farm stamps and I instantly fell in love with these adorable images.  Since I bought a few stamps, my friend thought I should be introduced to Copics next and there goes all my spending money for the next 5 years!

So I've been you-tubing, and reading all the ins and outs of Copic colouring.  I've been practicing like crazy and thought I would try participating into the Christmas in July challenge that The Greeting Farm has on their blog.

Here is my attempt with Holiday Anya:


Since I gave her red hair, I didn't want to go with the traditional red and green as I wanted her to stand out.  So I thought I would give her a more "frosty/icy" look by giving her a blue dress with light grey fur.  In keeping with the theme, I decided to go with a icy/wintery seasonal theme.

 I've used Stickles to give the holly berries some sparkle, and a dab of silver Stickles for her clasp so that she has a bit of bling!
 I looked through my stash and found some Queen & Co felt fusion ribbon so cut out these felt snowflakes to the card.  To add some dimension and sparkle, I've used a wee bit of Stickles here as well.

Now that I've done one...I must start on my Christmas cards.  It's never too early!

Thursday, July 3, 2014

Some Old Layouts

I've decided to separate my projects from my personal life in terms of a blog.  My non-crafty friends weren't really interested in reading about my projects but wanted to see what the family was up to, and vice-versa.

So I've decided to upload some of my older projects here.  As mentioned, I've taken several years hiatus due to a career change and a house move.  I've finally been able to settle down a bit and play, so hopefully you'll see some newer projects from me soon.


Made with Making Memories paper, Bazzill card stock, Autumn Leaves clear stamps
Scenic Route chipboard letters, Versa Ink and Zig pens.


Made with Sweet Water paper, Bazzill card stock, Sizzix font die cuts and the Coluzzle.


Made with Piggy Tales paper, chipboard letters unknown, Fontwerks stamp, Versa Ink and Zig pen.


Made with Piggy Tales paper, sheer ribbon (dollar store), American Crafts Thickers and rubons (unknown).

Made with Distinctly Me mesh, Prima flowers, Making Memories brads, Versa Ink, Distinctly Me Cork label holder, sheer ribbon (dollar store), Sizzix font.